Seeking an online presence for your business? Ain’t tech-savvy? But eager to set up a website for your company from scratch? If so, then you are fortunate enough to click your way through to reach the right webpage, where we will go over every step required in setting up a website.
In this article, we’ll be covering the step by step process that one needs to adopt to create a website from beginning to end. We will also be making relevant screenshots available to the readers at the end of every step to make the procedure crystal clear to the non-tech website seekers.
With that being said, let us get a quick tabular overview of the process involved in setting up a website for the readers, who are keen to know the steps in short before making a big leap forward.
| 1. Figure out a topic on which you want to setup your website. |
| 2. Choose a Domain name for your website. |
| 3. Pick the Right Web Hosting Plan from YouStable to host your Website |
| 4. Purchase/Place an order for a web hosting solution and Update the Nameservers |
| 5. Access your control Panel and install WordPress. |
| 6. Create your Website (Choose Themes). |
| 7. Add WordPress Plugins |
| 8. Strategize/Plan your content |
| 9. Add relevant Pages on your website. |
| 10. Engage website traffic by optimizing your WebPages. |
| 11. Socialize your website |
| 12. Make money from your website. |
If you want to know how to create a website from beginning to the end in detail, keep reading the article further.
1. Figure out a topic on which you want to setup your website.
First and the foremost step is to Pick a topic on which the information of your website is based.
Let’s just say that your website is about Mathematics Tutorials, then draft your purpose and goals of your website accordingly.

The best way to level your website in the initial stage is to identify your target audience and readers to make your content available to the right people (in the above case- Students, Teachers and Professors who have mathematics as their subject) or else the purpose of creating an online presence gets defeated.
Once you select the topic on which your website is based, you are to choose the domain name.
2. Choose a Domain name for your website.
A domain name is something that people type in their web browser or URL box to reach you online. It is like a home address of your website, where visitors can find all the information, files, images, audio and video live on your website.
Now since you’ve got to know what Domain name actually is! Let’s see what domain name you should choose for your website.
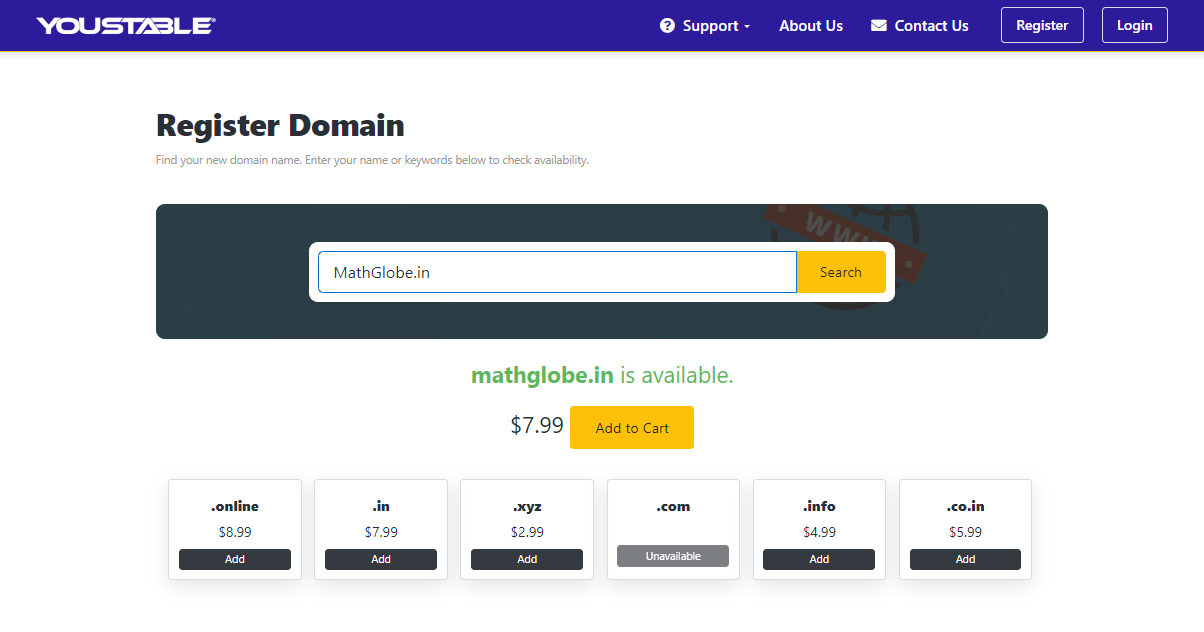
- A domain name (in short-a BrandName of your website) should be crisp, which your audience can easily memorize and type instantly in the URL box or web browser (like in the above example: MathGlobe– For a Website giving mathematics tutorials to students).
- After choosing an engaging and eye catching domain name for your website, Pick the right web hosting service(Youstable) for your website which happens to be the most important part of your entire website setting up process.
- Then, register your chosen Domain name with youstable > choose a domain extension(.com/.in/.co.in/.xyz) > Press the check option to make sure that the chosen domain name is available online > Lastly, Press the Add to Cart option to buy the domain for a year.
(We know what question you have in mind. Domain name available online? What does that mean? Before we move on to solve this doubt, you need to understand that the domain name is a fingerprint of your website.
Like a fingerprint, a domain name is unique and is not possessed by anyone but you. That’s why we first need to check if the domain name is available or not. It is after that you can purchase it.)
To know further about the registration process, Scroll down further to discover it.
3. Pick the Right Hosting Service Provider to host your Website(YouStable)
Hosting service? What does that happen to be? Don’t you have this question in your mind? Take no worries as we are going to decode each and every term for your suitability.
To start off with, understand! that A website has several web files stored for the visitors to get access to when they type the domain name of the website.
These web files require a lot of storage and need to be online 24/7 to be accessible to the visitors round the clock.
To provide online accessibility and large storage space(also known as website Hosting) you have two ways out:
- Host the website yourself.
- Rent Hosting service from a hosting provider.
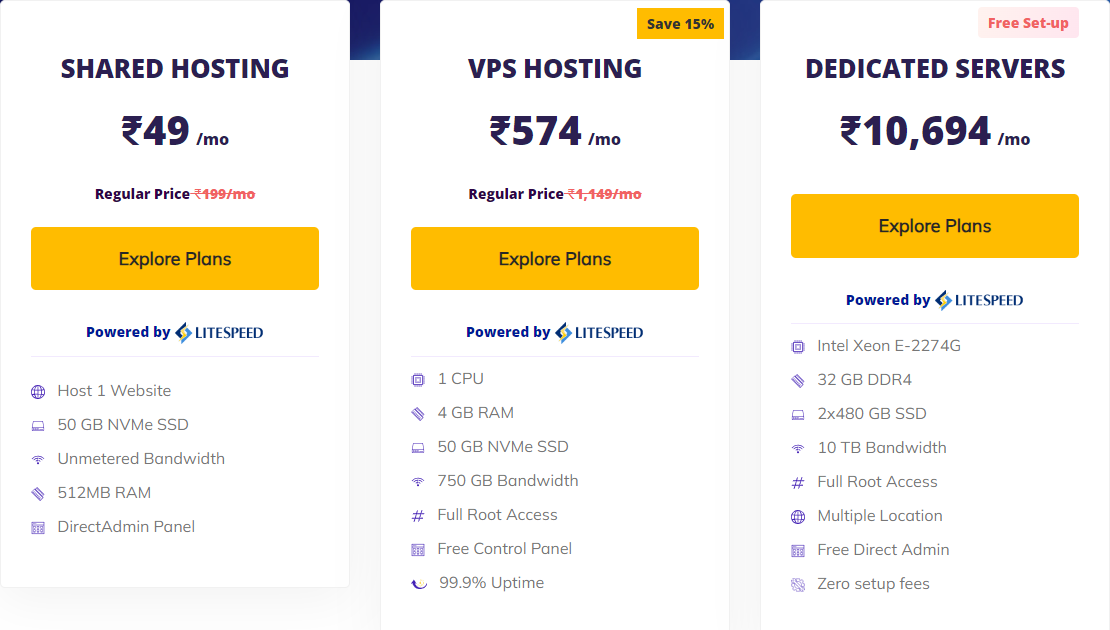
- Shared hosting (useful for small business, simple bloggers, students and newbies)
- VPS hosting (For greater website needs)
- Dedicated server hosting (to manage and take absolute control of your server)
The first option seems costly as hosting a website requires a gamut of time, money and energy, which you’ll find to be a herculean task. So what we are left with is the second and the perfect option, that is to Rent Hosting services from a hosting provider.
Picking the Right Hosting Plan from YouStable is the biggest challenge among the newbies.
Don’t you know we are here to make your work easy? Absolutely Yes! So leave this difficult job of choosing the Right Hosting plan with us.
| Highest uptime ensuring your website runs online 24/7. NVMe SSD storage drives for efficient data transfer. SSL certificates to make your website safe ensuring encrypted communication with your visitors. Fastest web servers to ensure lightning fast website availability. Daily Backups to enable you to restore your 7 day data anytime. Advanced Security to protect your site from all sorts of online threats. cPanel to manage your website. |
These are the most basic features presented above in the tabular format that any website needs to run without any hindrance.
To this, comes YouStable, that not only offers:
- 99.99% guaranteed uptime
- Latest NVMe SSD storage technology
- Free SSL certificates
- LiteSpeed WebServers
- Daily Backups
- Imunify360 for advanced security
- A user-friendly control Panel
But also provides all these features at very affordable rates making it comfortable for any newbie with a want of an online presence on one hand and Budget constraints on the other hand, to purchase hosting services from Youstable.
Now that you’ve chosen the Right Hosting Plan to get your website hosted, let’s make a move forward to see how you can Register a new Domain and purchase the web hosting solution as well.
4. Purchase/Place an order for a web hosting solution and Update the Nameservers.
To Register a new Domain name for your website & Purchase a web hosting service plan from YouStable, you need to follow the stepwise instructions given as under:
- Visit the official website of YouStable > Drag down the Web Hosting tab from the HomePage of YouStable > Click the Shared Hosting option.
{Why Shared Hosting? Choose shared hosting because the requirement is not high at initial launch of your website but as the traffic-number of clicks increases, you can switch to VPS hosting or Dedicated server hosting service, where you can rent an entire server for your
Website}
- Choose the basic plan for ₹49 per month > Click the Order now option.
- Select an appropriate billing period (Monthly/Annually/Triennially) > Now Register a new Domain name for your Website > Type the domain name in the required box > Choose the domain extension (.com/.in) > Press the search button.
- Since you are new to YouStable, you need to first sign up for using hosting services > Enter your personal information (Name/Valid email address/Contact no.) > Type your billing address > Generate a strong password for security purposes.
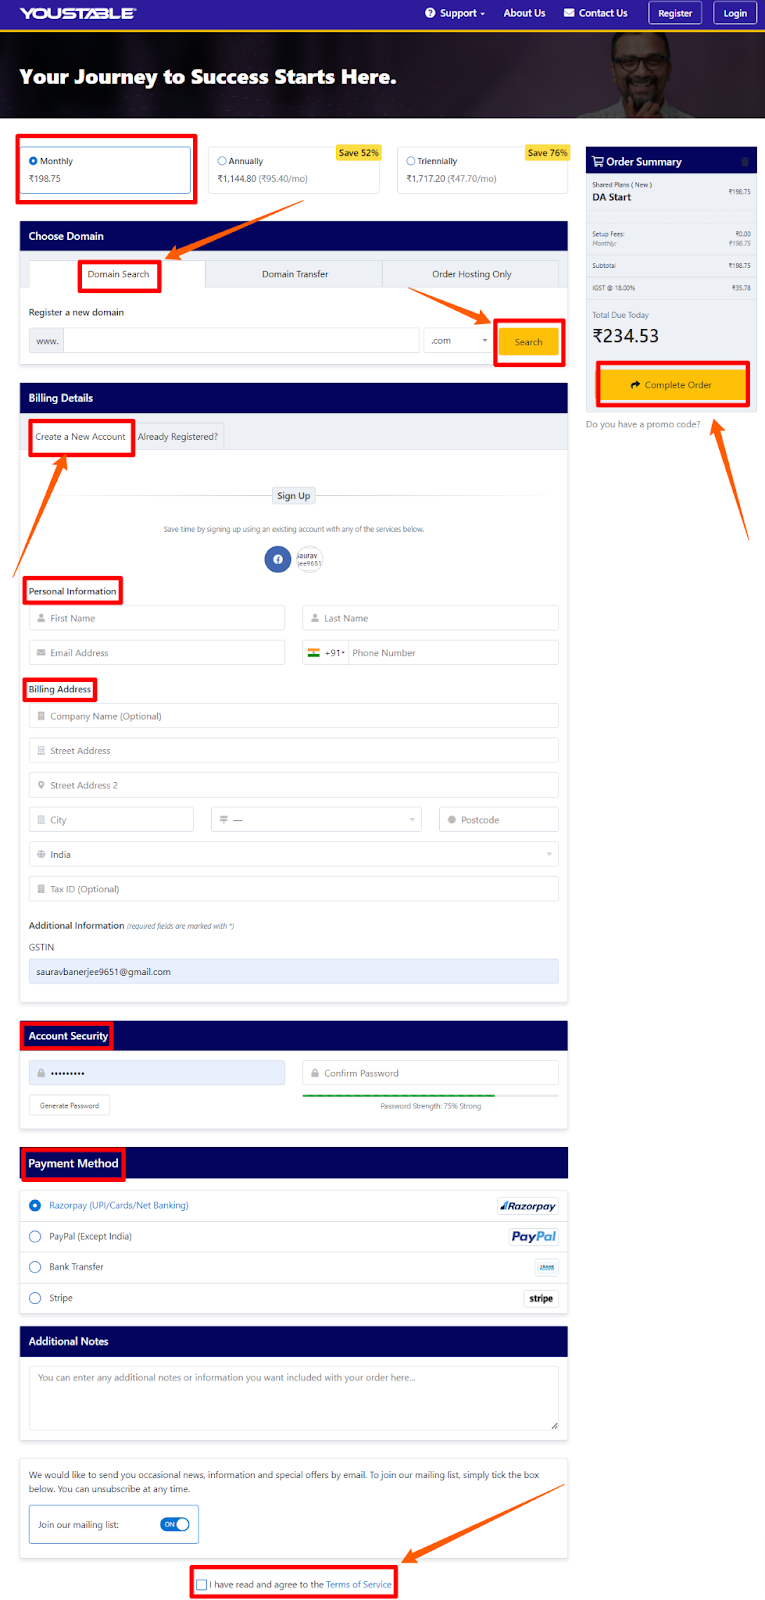
- Select the appropriate payment method (PayPal, Razorpay, Stripe, Bank Transfer) > tick the checkbox to agree with the terms of services > Press the Complete Order option.
After following all steps provided above, your order is successfully placed and activated soon after the payment is through.
By now, you have signed up for YouStable, registered a new Domain name, Ordered Shared web hosting services and got your hosting service activated.
What’s next in the list? Well! That is updating nameservers to make sure your clients can approach your website without any issue. So now what’s nameservers? buckle up and keep reading the article further.
Nameservers are like a phone directory of your system. It converts the domain name into numerical IP addresses and vice-versa.
- On your order activation, Login to your YouStable account > Reach your Dashboard > Click the domain whose nameservers you have to fix.
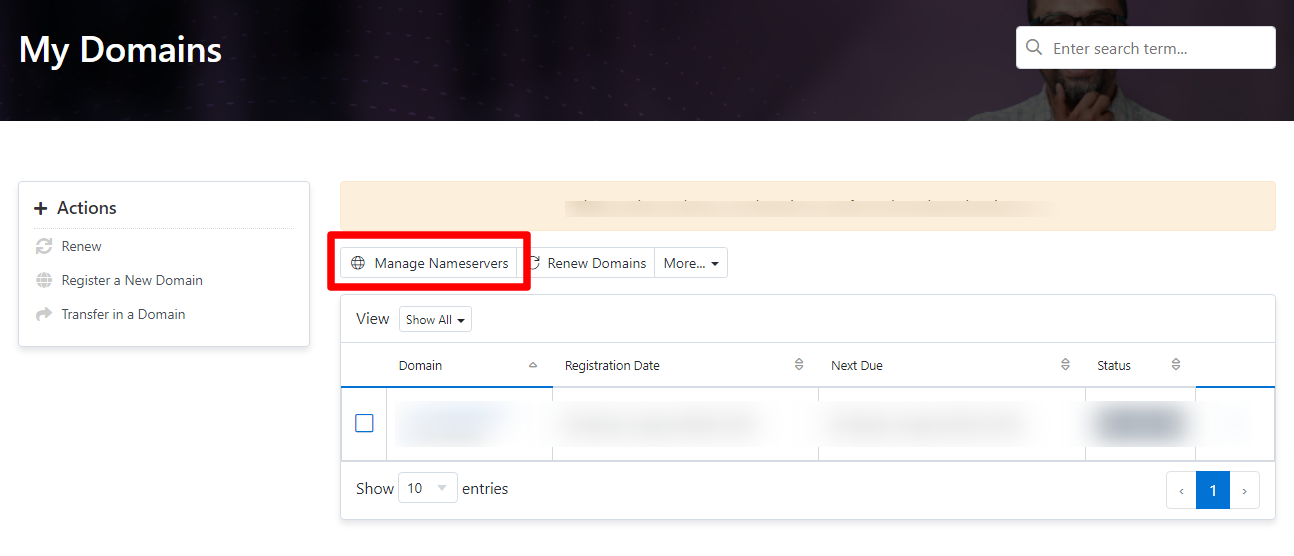
- On clicking the domain name > Go to manage nameservers > Use default nameservers > Save Changes.
With nameservers being configured let’s now make further clicks to the Access Control Panel and install WordPress to create your website.
5. Access your cPanel and install WordPress.
Yeah! You heard that right. Login to your cPanel of your web hosting account to manage your website.
Adopt the following steps to Access the cPanel of your web hosting account:
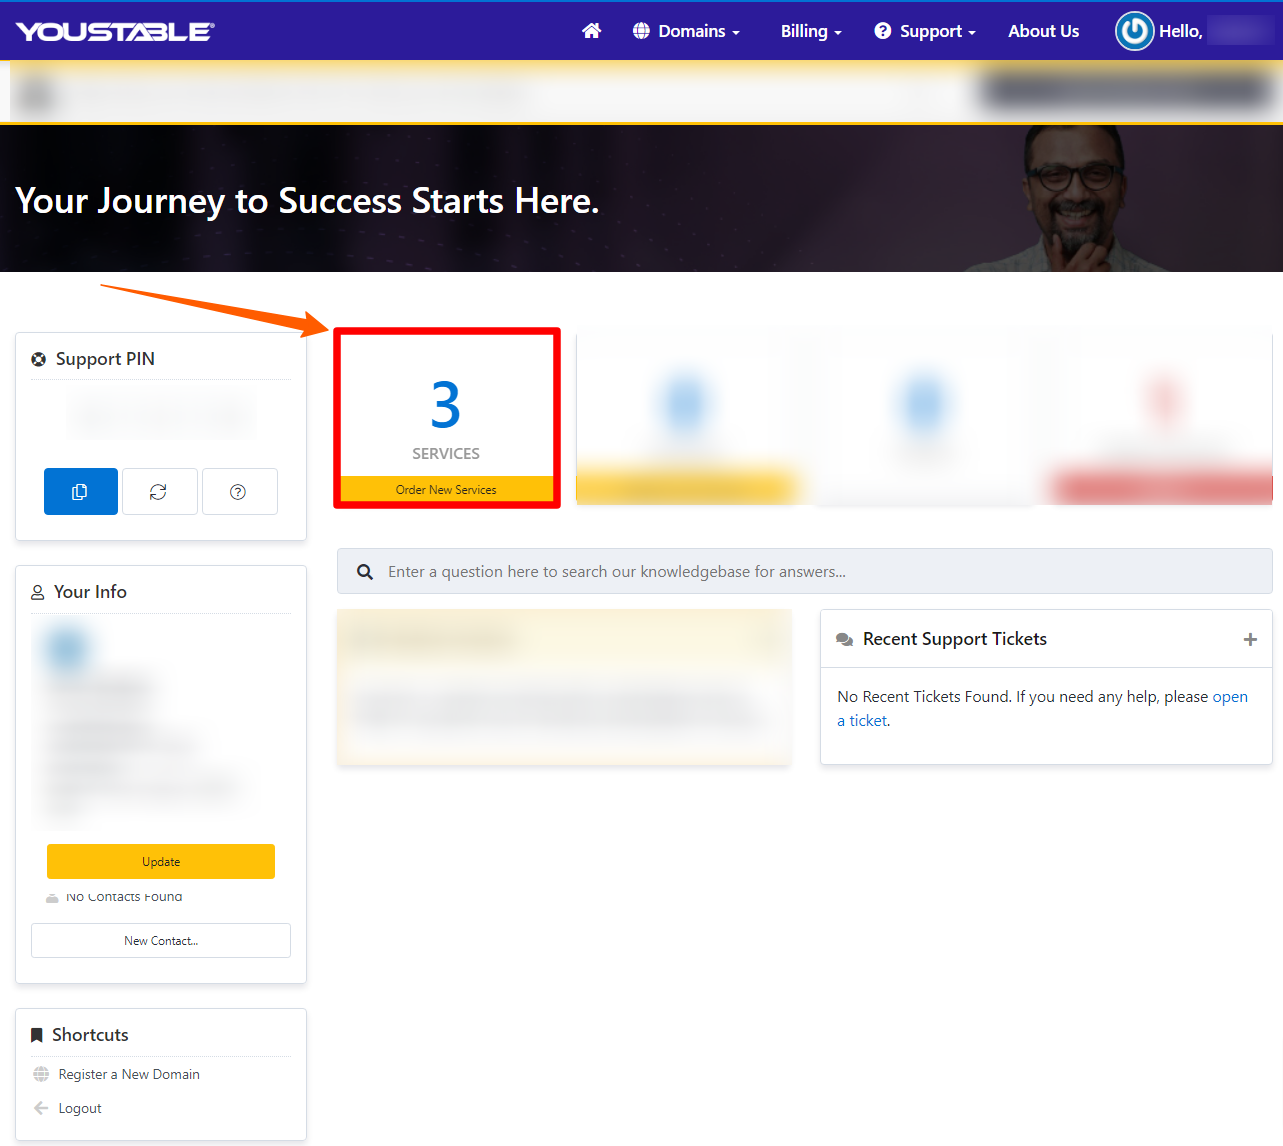
- Press the My Account tab, provided at the top right corner of the HomePage > Enter your Login credentials > Press the login button.

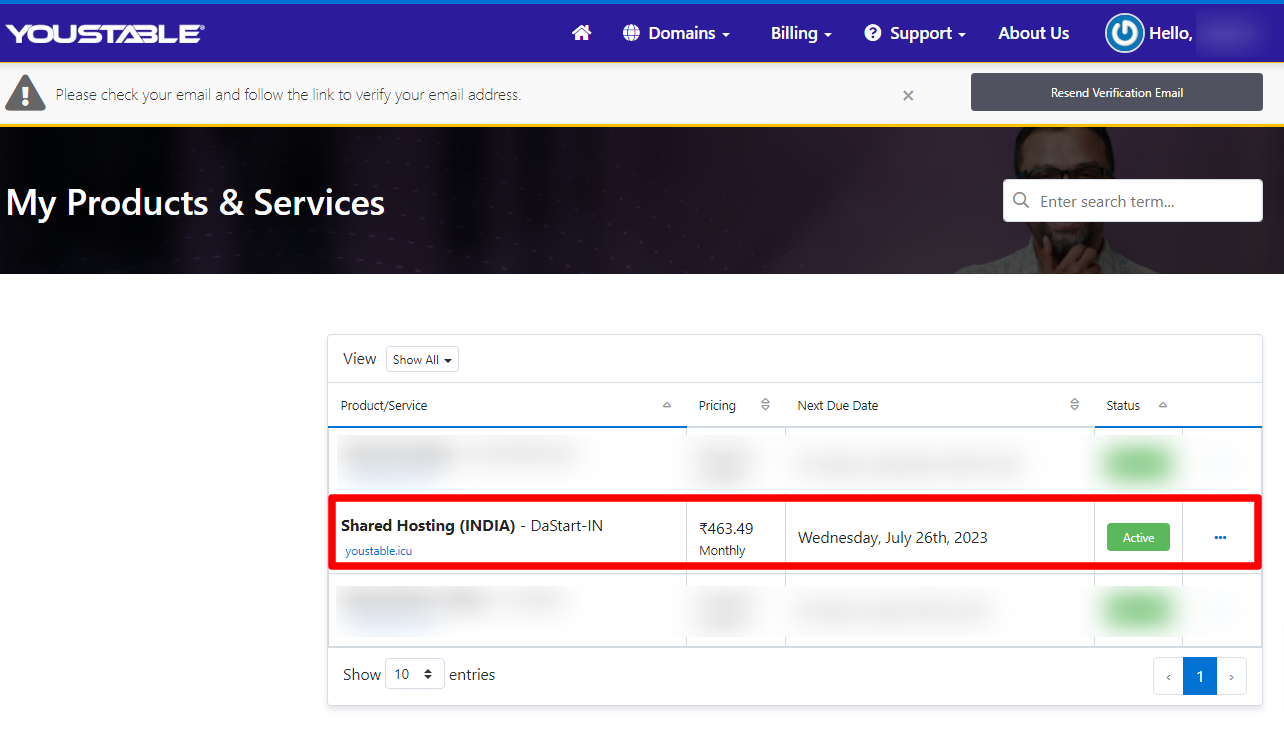
- On pressing the login button > you’ll reach your Dashboard > Click the Service tab.
- Click the Green Active button provided at the right side of your registered Domain name.
- On clicking the above option > Scroll Down to click the Login to cPanel option to proceed further.
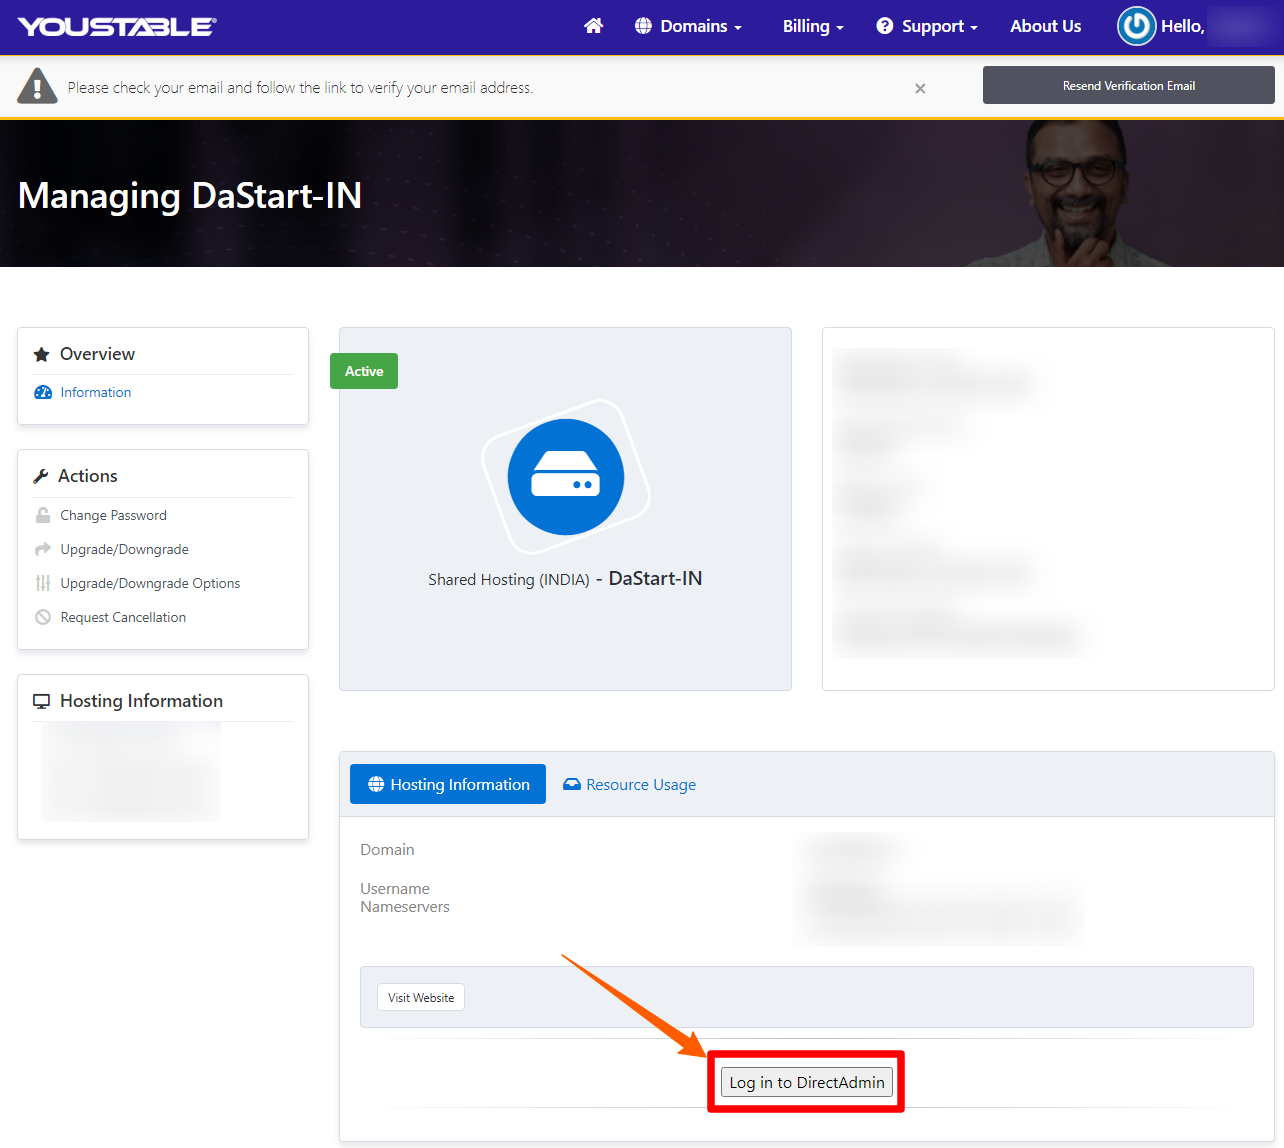
Easy to follow the steps right? Now that you are in the cPanel of your hosting account, our waiting finally comes to an end. Easy cPanel interface and one click installation adds a sweet cherry on top of the hosting solutions offered by YouStable.
So, we have the cPanel interface in front of us. Now what to do? Well! Stay calm and enjoy the ride.
6. Create your Website (Choose Themes)
Already your cPanel is being displayed on the desktop, providing you several options to manage files in your website.
But since our need is to create a website first, we need to follow the given steps to do so:
- As soon as the cPanel is logged in > Scroll down further to reach the WordPress icon under the Softaculous App installer tab.
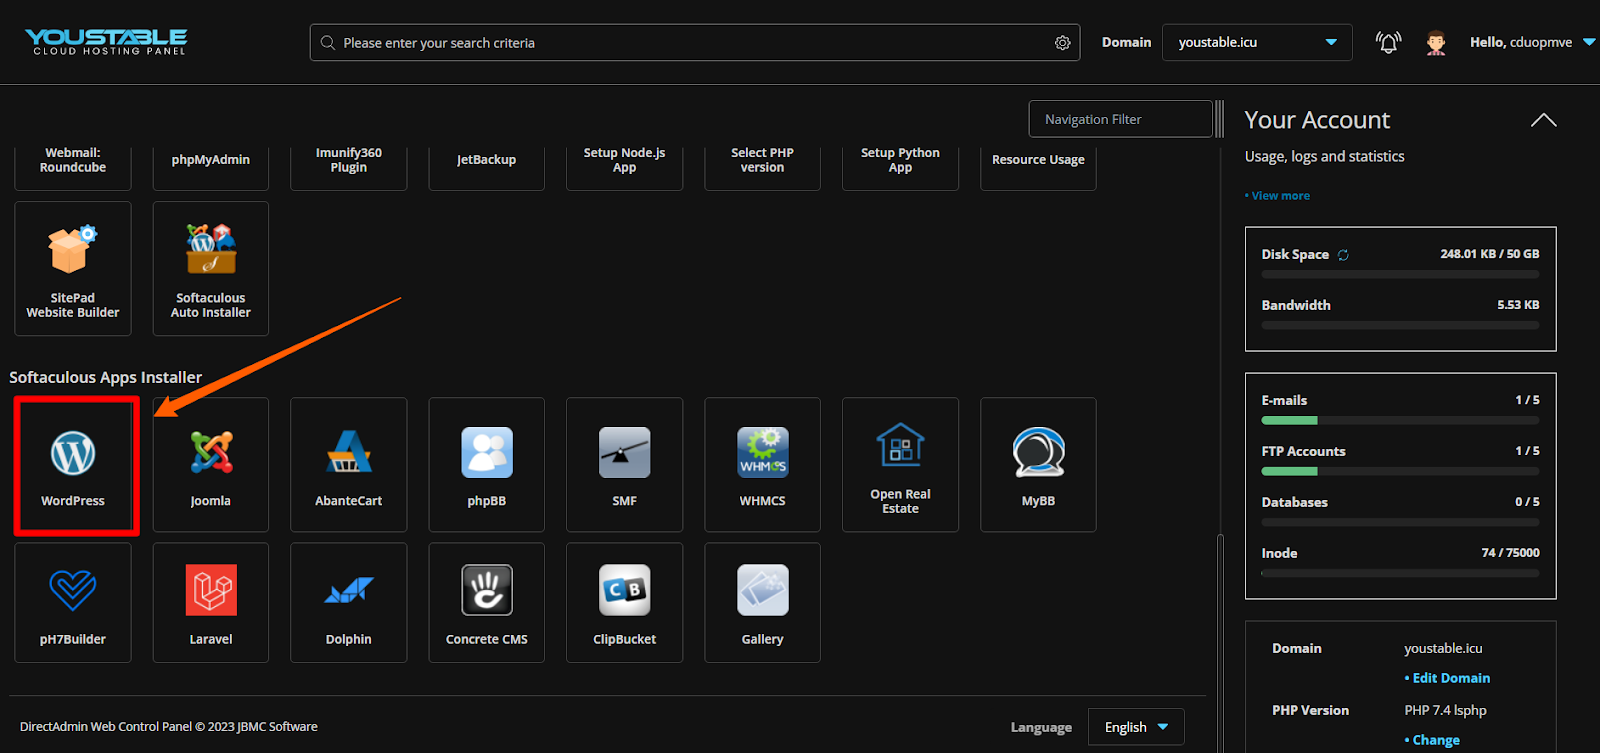
(Why WordPress? In short, WordPress is an amazing web software, that assists the users in designing websites for Blogging and many other projects)
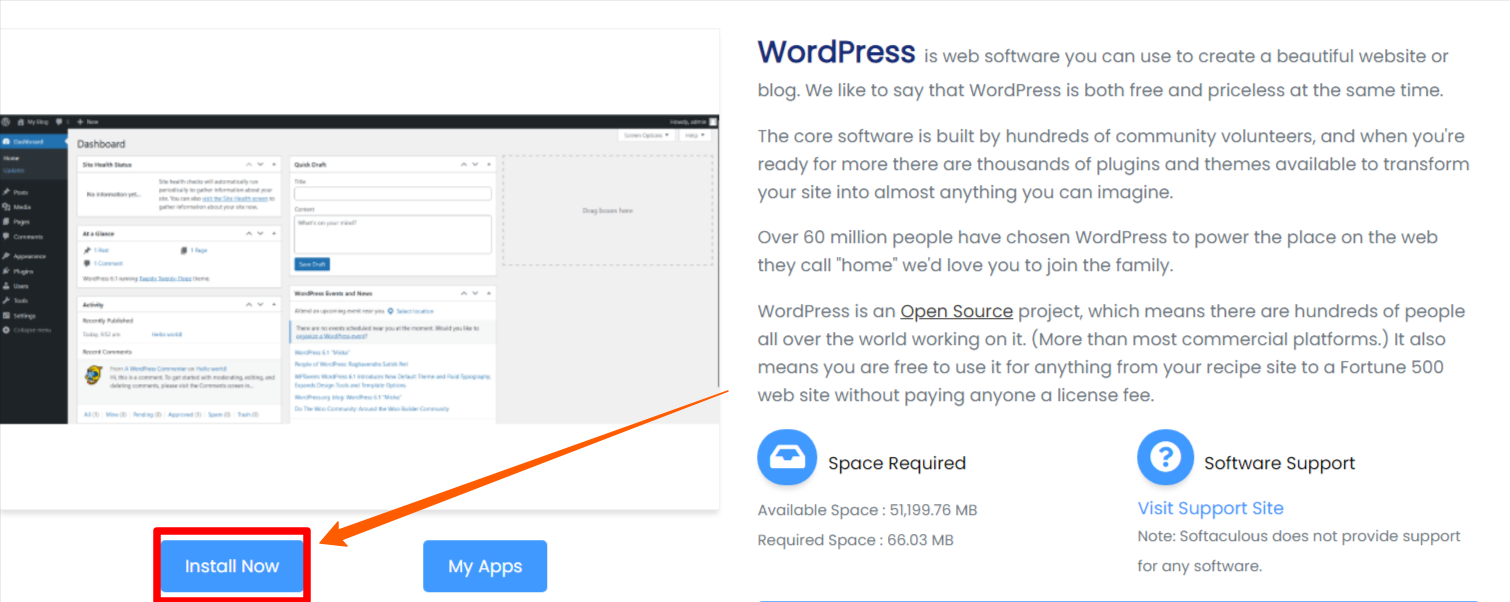
- On Clicking the WordPress option > Press the Install now option
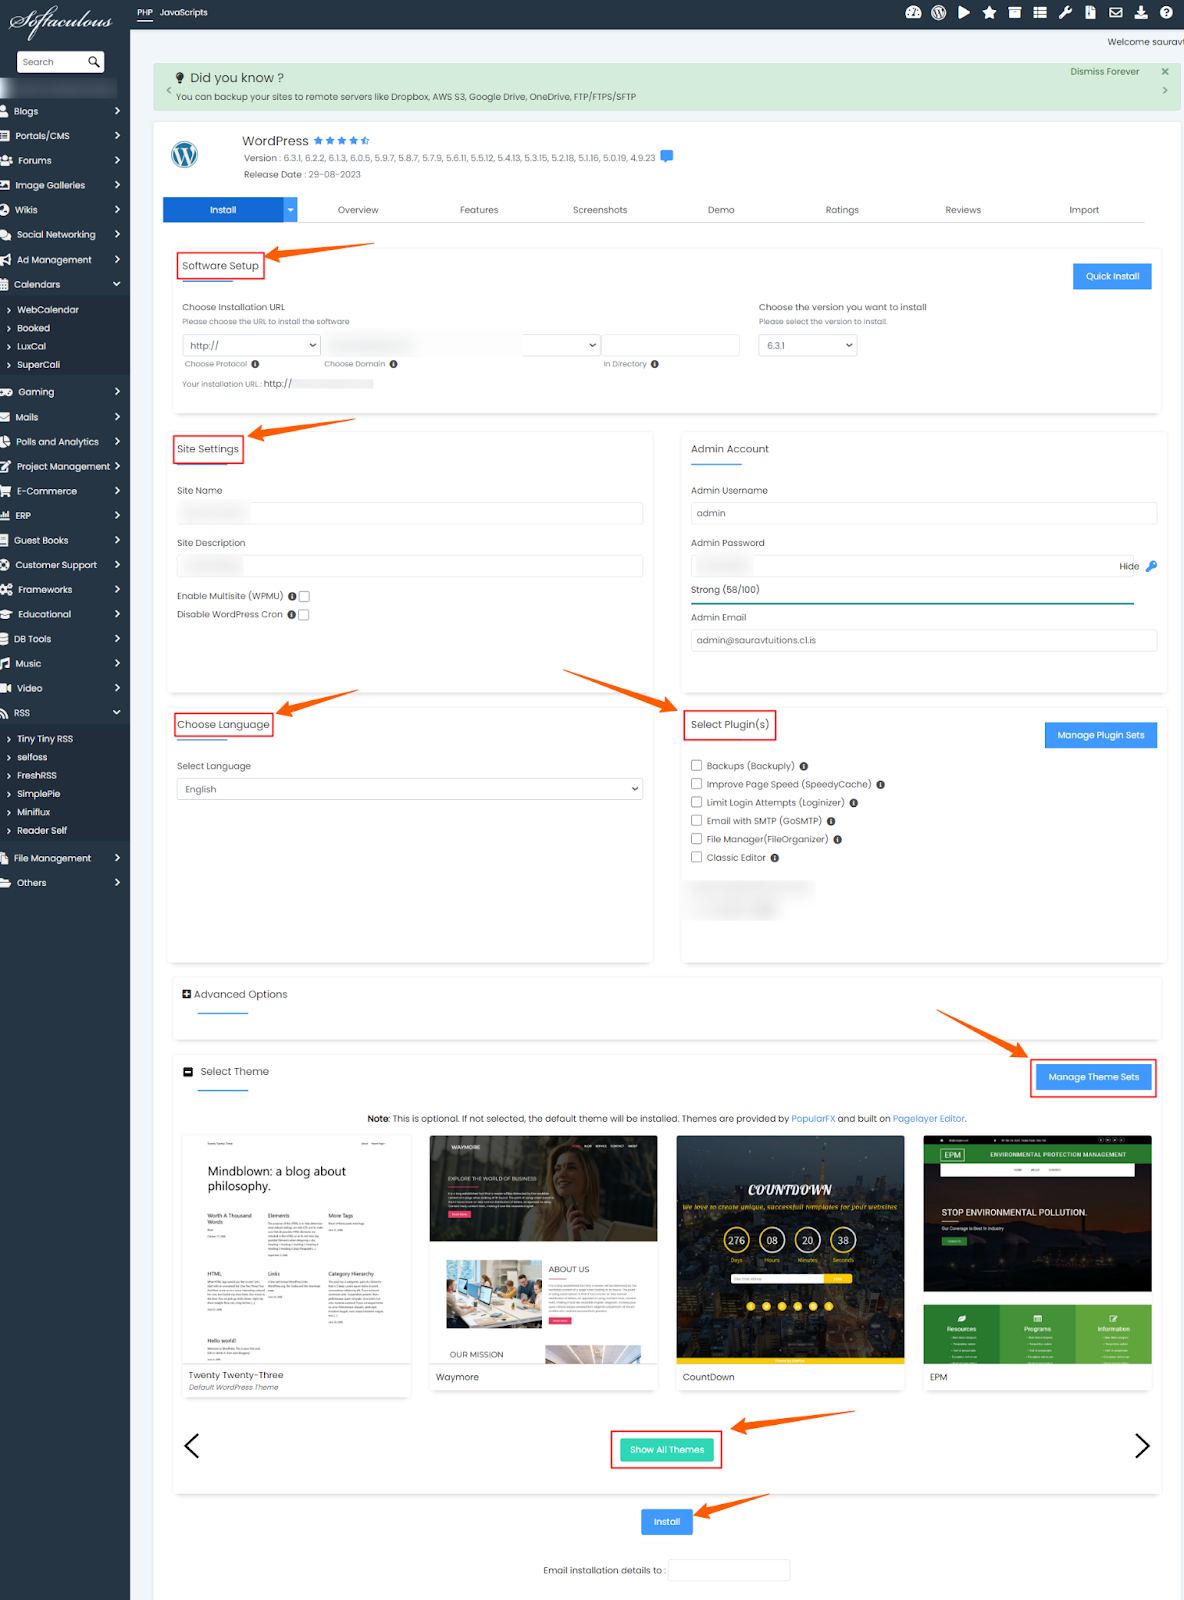
- Enter the Site name & Site description > Select the appropriate language for your website > Choose the theme for your website.
(Theme chosen should be such that it matches the nature of content of your website)
- Finally press the install button to initiate the installation process of WordPress.
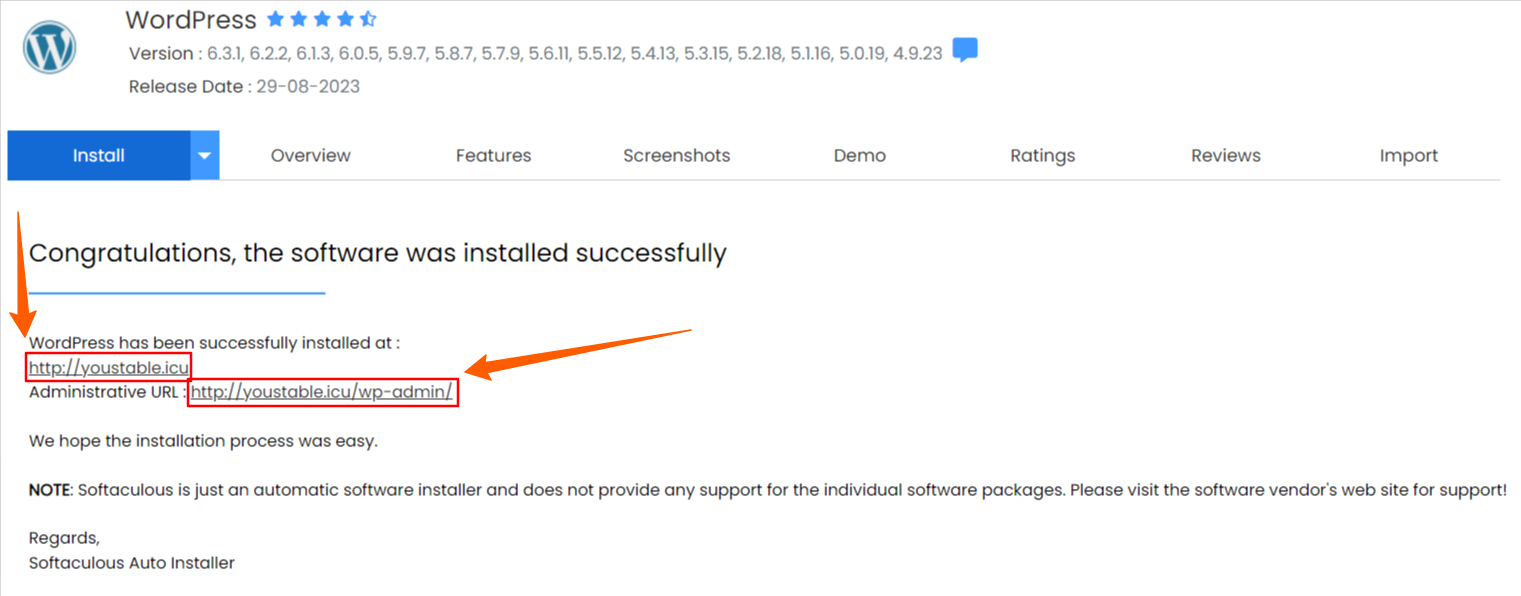
- After the installation of WordPress > Link to your website and a link to your WordPress Admin to manage the content of your website is provided > On clicking the link you’ll be directed to the above mentioned location.
Now that you’ve successfully installed the WordPress in your cPanel, it’s time to Add necessary Plugins in your WordPress.
7. Add WordPress Plugins
In short, Add only those plugins that are required for a newly created WordPress. So the followings are:
- Yoast SEO
- Short Pixel
- JetPack by wordpress.com
These plugins mentioned above will ensure that you have all the basic plugins installed on your wordPress.
Now your WordPress is ready to publish your content online. But first you will require to plan your content structure. As we used to make a timetable for every period of the day during our school days, the same way we have to plan our content beforehand to start publishing it online.
Look at the further steps to see how it is done.
8. Strategize/Plan your content
The small but significant part of your website creation is Strategizing your content and planning the pages you would be structuring in your website.
You can simply draft the content matter on your rough copy and make a list of all those topics you would be covering in your website.
For instance, let’s take the example of the mathematics tutorial website that we took above. Firstly, plan the chapters that you would be covering in your website and the number of words, images, PDFs and many other stuff you’ll be adding to your Mathematics tutorial website.
Secondly, Use WordPress admin link to type the necessary content to publish the matter online. You can even update your matter that you publish, with time.
Now Let’s know what WebPages you are required to have to make sure to make your website visitor friendly. Read more to know about it.
9. Add relevant Pages on your website.
The WebPages that one definitely needs to have on his website to make it more optimizable and approachable, are as follows:
- HomePage: This Page contains the relevant matters pertaining to your website. The creamy details of your content are here on this page. Add Relevant images as well to make it more eye-catching.
- About Me: On this page, write details about you so that visitors clicking to approach your website can know your work, achievements and your ultimate vision.
- Contact Us: This page will carry all your contact details (Office Address/ Location/Phone.no/email address/Fax and many more)this enables the visitors to contact you as and when required.
After Adding the relevant Pages in your website, it’s time to optimize your website by increasing the number of clicks. Make a leap further to acknowledge how one can optimize their website.
10. Engage website traffic by optimizing your WebPages.
Many users, who are newbies, miss the optimization part when putting content in their website online, And this is where they become vulnerable to losing the game!
Search engine optimization(SEO) in a nutshell, helps you to get viewers from organic search, which in turn makes more money for you.
There are fundamentally three core parts of SEO:
- On-Page SEO (Content Quality. Keyword location)
- On-Site SEO (interlinking the Pages in your website)
- Off-Site SEO (Adding Links from some other websites)
If you are done with the stuff mentioned above, you’ll start receiving organic clicks from the visitors.
What about socializing the website? Socializing your website may increase the number of organic clicks on your website thereby giving more eyes to your content published.
11. Socialize your website
Add relevant social media links to you Contact Us page of your website, to enable target visitors from:
- Youtube
Include the links of all the aforementioned social media links to Contact Us page, to increase the number of clicks in your website.
Finally, it’s time to Make money from your website.
12. Make money from your website.
There are a gamut of ways by which your website can make Passive income for you. Have a look below to know about it:
- Setup Ads
- Google AdSense
- Affiliate Marketing
- Digital Products of your own(PDFs, EBooks, Online Store, Online Course)
Websites can derive more fruits once you start earning from it. The Site mentioned above(Google AdSense) will require you to fill a few formalities (like- no. of visitors, email address, your website link) to register. After a few processes, your website gets monetized enabling you to earn annually.
Before you move ahead with making money from your website process, make sure that the average number of visitors on your website is more than 50,000 or so.
So here we are, Right from being a Noob to being a Pro in website creation. And with Youstable, providing top-notch web hosting services, elevated the website hosting experience to a greater height.
We advise you to follow each and every step with carefulness making sure you do not miss even the slightest configuration while creating your website. The images provided along with the relevant steps will help you navigate well.
And if by chance you have an issue to address regarding the website building steps or some insightful comments to make, then for that we are all ears. We’ll be grateful to hear from you.